Posts Tagged ‘Linux’

Play 1080p YouTube Video using HTML5 on Mozilla Firefox Linux

July 15, 2015

The latest Adobe Flash Player for is the version 11, compared with version 18 in other OS. Adobe decided to not give further update to Linux. Along with the increasing concern about Flash’s vunerability, currently with the recent update, there will be a warning for us to open the Adobe Flash Player in Linux. It closes so many ads in the websites, that is good, but in other side if you open YouTube we need to activate the plugin first to watch the movie.

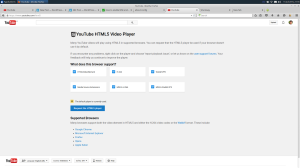
Mozilla is on it’s way to create the replacement for Flash based on HTML5 (read: The Shumway Project) but it will took sometimes to be accepted generally among the web developer. Actually in YouTube we could activate the HTML5 player to replace the Flash Player by clicking https://www.youtube.com/html5 and choose “Request HTML5 Player” then it would change the player to HTML5 version.

But when we watch with the HTML5 player, the maximum resolution we could play is 720p. This is because from 6 options, Mozilla Firefox on Linux is not able to select:

  • Media Source Extensions (MSE)
  • MSE & H.264
  • MSE & WebM VP9

Those caused the video resolution is only until 720p.

To enable those options, based on the solution on “How to enable MSE and native HTML5 support in Firefox on Linux“, we shoud go to about:config page, then we will see warning screen as follows:

about:config

Choose “I’ll be careful, I promise!” and we will see the list. Activate and make sure these options set as “True”

  • media.encoder.webm.enabled
  • media.fragmented-mp4.enabled
  • media.fragmented-mp4.exposed
  • media.fragmented-mp4.ffmpeg.enabled
  • media.mediasource.enabled
  • media.mediasource.mp4.enabled
  • media.mediasource.webm.enabled

Make sure this option is set as “False”

  • media.fragmented-mp4.use-blank-decoder

Then you will see the options are all blue.

about:config

Enjoy the 1080p video on HTML5 player.


Anton Hermansyah

Logo of Anton Hermansyah

Change Resolution of Unknown Monitor in Ubuntu 11.10

January 30, 2012

Ubuntu LogoI have the HP v185e Monitor and it was unrecognizable by my Ubuntu 11.10. The “Display” setting shows “Unknown Monitor”, and the maximum resolution I could get is 1024 x 768, the optimal resolution is 1368 x 768. I found that the “Unknown Monitor” could be set with XRandr from the posting in the Ubuntu Forum.

I did that right and the resolution is 1368 x 768, but after restarting, the resolution options were reverted back to 1024 x 768. From the Ask Ubuntu, I found that Ubuntu 11.10 have different way to permanenting the XRandr customization than it’s predecessors.
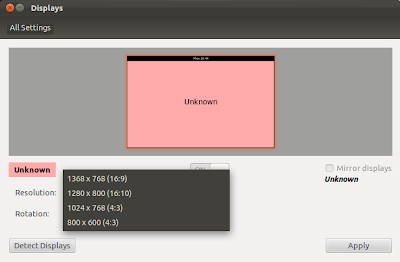
XRandr 001

Here’s the summary (I’m using the example of adding 1440 x 900 resolution):

  1. Open Terminal and type
  2. $ xrandr
  3. The XRandr will show the maximum resolution allowed like this:
  4. Screen 0: minimum 320 x 200, current 1368 x 768, maximum 8192 x 8192
    VGA1 connected 1368x768+0+0 (normal left inverted right x axis y axis) 0mm x 0mm
       1368x768_60.00   59.9*+
       1024x768       60.0  
       1024x768_60.00   59.9  
       800x600        60.3     56.2  
       848x480        60.0  
       640x480        59.9  
       1280x800_60.00   59.8  
    HDMI1 disconnected (normal left inverted right x axis y axis)
    DP1 disconnected (normal left inverted right x axis y axis)
    HDMI2 disconnected (normal left inverted right x axis y axis)
    DP2 disconnected (normal left inverted right x axis y axis)
    
  5. Type “cvt [x resolution] [y resolution]” in the terminal, for my case is like this:
  6. $ cvt 1440 900
  7. The Terminal will show the output:
  8. # 1440x900 59.89 Hz (CVT 1.30MA) hsync: 55.93 kHz; pclk: 106.50 MHz
    Modeline "1440x900_60.00"  106.50  1440 1528 1672 1904  900 903 909 934 -hsync +vsync
    
  9. For the next step, type:
  10. $ xrandr --newmode [Modeline]

    in my case is

    $ xrandr --newmode "1440x900_60.00"  106.50  1440 1528 1672 1904  900 903 909 934 -hsync +vsync

    Copy the “Modeline” configuration from the previous output

  11. To add the new resolution to the “Display” option type:
  12. $ xrandr --addmode VGA1 1440x900_60.00

    Now the new resolution is ready in the “Display” option
    XRandr 002

  13. To apply the new resolution, type:
  14. $xrandr --output VGA1 --mode 1440x900_60.00

    And now the screen will be in the new resolution

  15. In order to make it permanent, add the resolution to /etc/X11/xorg.conf
  16. $ sudo gedit /etc/X11/xorg.conf
  17. The xorg.conf will show the output like this:
  18. Section "Monitor"
        Identifier    "Monitor0"
        Modeline "1280x800_60.00"   83.50  1280 1352 1480 1680  800 803 809 831 -hsync +vsync
        Modeline "1368x768_60.00"   85.25  1368 1440 1576 1784  768 771 781 798 -hsync +vsync
        Modeline "1024x768_60.00"   63.50  1024 1072 1176 1328  768 771 775 798 -hsync +vsync
    EndSection
    
    Section "Screen"
        Identifier     "Screen0"
        Device         "Card0"
        Monitor        "Monitor0"
        SubSection "Display"
            Modes      "1280x800_60.00" "1368x768_60.00" "1024x768_60.00"
        EndSubSection
    EndSection
    
    Section "Device"
        Identifier    "Card0"
        Driver        ""
    EndSection
    
  19. Add the new Modeline and resolution, for the “Driver” in the “Section Device” I just simply type “Intel” (because I’m using intel standard graphic card), if you are using Nvidia just simply type “nvidia”. The output is like:
  20. Section "Monitor"
        Identifier    "Monitor0"
        Modeline "1440x900_60.00"  106.50  1440 1528 1672 1904  900 903 909 934 -hsync +vsync
        Modeline "1280x800_60.00"   83.50  1280 1352 1480 1680  800 803 809 831 -hsync +vsync
        Modeline "1368x768_60.00"   85.25  1368 1440 1576 1784  768 771 781 798 -hsync +vsync
        Modeline "1024x768_60.00"   63.50  1024 1072 1176 1328  768 771 775 798 -hsync +vsync
    EndSection
    
    Section "Screen"
        Identifier     "Screen0"
        Device         "Card0"
        Monitor        "Monitor0"
        SubSection "Display"
            Modes      "1440x900_60.00" "1280x800_60.00" "1368x768_60.00" "1024x768_60.00"
        EndSubSection
    EndSection
    
    Section "Device"
        Identifier    "Card0"
        Driver        "intel"
    EndSection
    
  21. Restart and see the resolution setting is now permanent

Hope it worked


Anton Hermansyah

Logo of Anton Hermansyah

Record YouTube with Audacity on Ubuntu 11.10

January 13, 2012

Audacity LogoSometimes I prefer to hear the live version of the music (which I thought better than the recording version) that available on YouTube. I have experienced recording from YouTube with Audacity, but using Ubuntu 7, very-very long time ago. When I tried to record again, I found some diffculties that no sound recorded to the Audacity.

The page from Audacity Team said that I need to turn my ‘Input Device’ to ‘Stereo Mix’, but there is no ‘Stereo Mix’ option in my Audacity, it’s on Windows. My list of ‘Input Device’ is:

  • HDA Intel PCH: ALC892 Analog (hw0,0)
  • default: Rear Mic:0
  • default: Front Mic:0
  • default: Line:0
  • default: Rear Mic:1
  • default: Front Mic:1
  • default: Line:1

There is nothing on the list that can record from the stream, all option is silent.

I followed the suggestion from Linuxer to configure the ALSA Mixer using command

$ alsamixer

Alsa Mixer
Then I need to activate the capture device, done. After I tried to record again but the results are:

  • HDA Intel PCH: ALC892 Analog (hw0,0)
    • Nothing Happened
  • default: Rear Mic:0
    • Nothing Happened
  • default: Front Mic:0
    • Noise from my Mic but the stream recorded a bit in the background
  • default: Line:0
    • Nothing Happened

I was getting a little mad. The thread from Ubuntu Forum suggested me to use Ardour. I went to Ubuntu Software Center and installed Ardour, but I want to give one more shot to Audacity. From the Stream Recorder Forum it was suggested to install PulseAudio Volume Control, I installed the volume control and got the ‘Input Device’ option in Audacity had more options:

  • HDA Intel PCH: ALC892 Analog (hw0,0)
  • pulse: Rear Mic:0
  • pulse: Front Mic:0
  • pulse: Line:0
  • pulse: Rear Mic:1
  • pulse: Front Mic:1
  • pulse: Line:1
  • default: Rear Mic:0
  • default: Front Mic:0
  • default: Line:0
  • default: Rear Mic:1
  • default: Front Mic:1
  • default: Line:1

Then I followed the instructions to change the ‘Output Device’ and ‘Input Device’ option in Audacity to ‘Pulse’, let the PulseAudio Volume Control open when recording the stream with Audacity. Still, nothing changed. Then I found the page from Audacity Team stated that I need to configure the PulseAudio Volume Control. There are some configurations that I did:

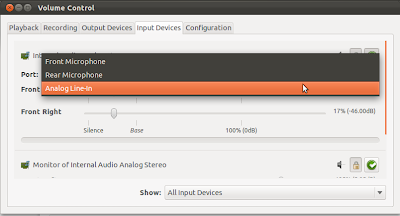
  1. Go to ‘Input Devices’ Tab, in the ‘Internal Audio Analog Stereo’ option, look for ‘Port’ tab
  2. There are options for ‘Front Microphone’, ‘Rear Microphone’, and ‘Line In’. set all of those volume to silence, I can let it go, but just for precautions if the microphones’ noise disturb the recording
  3. PulseAudio Volume Control 001

  4. Scroll down and there is ‘Monitor of Internal Audio Analog Stereo’, to make sure the stream can be recorded, play the stream, watch the bar below the volume adjustment, if moves then the recording process can be done
  5. PulseAudio Volume Control 002

  6. Go to ‘Recording’ Tab, there is notification that no plug-in doing the recording, don’t worry
  7. Play the stream, push the record button on the Audacity, then back to the PulseAudio Volume Control, on the ‘Recording’ tab, it can be seen that now there’s an option for Audacity recording
  8. At the ‘ALSA plug-in [audacity]: ALSA Capture from‘ option, change the ‘Internal Audio Analog Stereo’ to ‘Monitor of Internal Audio Analog Stereo’
  9. PulseAudio Volume Control 003

  10. The Audacity could record the stream by now

Happy recording!


Anton Hermansyah

Logo of Anton Hermansyah

Convert SSA to SRT Subtitle in Ubuntu

October 22, 2009

Ubuntu LogoWatching downloaded movie is my new hobby, yeah I know it’s kinda illegal but sometimes there are movies that you couldn’t found in the store. One of the problem is the subtitle, sometimes it’s only available in SSA format which Totem Movie Player couldn’t play. One of the solution is download VLC Media Player but the buffering process is slow (in my laptop especially) and sometimes hang. I need to watch it without troubles and I don’t understand Japanese yet.

So I need to convert the subtitles and watch it at Totem. I’ve tried to convert it manually but takes a long time even just for 30 minutes movie. And I found Gaupol an subtitle editor :

  1. Install Gaupol with :
    $ sudo apt-get install gaupol
  2. Open the SSA subtitle
  3. Save As… (Not ‘Save Translation As…’)
  4. Select ‘SubRip’ at the ‘Format’ selection
  5. Don’t forget to put it under the same name as the movie and in the same folder

Then you have a SRT subtitle and you could watch the movie in Totem. Have a nice watch!


Anton Hermansyah

Logo of Anton Hermansyah

Add Indonesian Dictionary in OpenOffice 3

September 29, 2009

in this new OpenOffice 3, the dictionary system is different than the previous one. So I couldn’t use the old dictionary format, unfortunately there’s no Indonesian dictionary at the repository. There’s a spellchecker uploaded by Rossano Rossi, but it doesn’t worked. I search for the alternative way and arrived at this page. Seems like not just me who have this problem in my Ubuntu.
(more…)

KDE 4, Ready or Not Ready?

July 19, 2008

KDE 4 LogoBefore we go to the topic, I just want to say that this post doesn’t suggest you to be ready to use KDE 4, but in contrary I just want to review and give my opinion about the brand new KDE 4.

If you are the Linux user, before you log in you can choose the type of sessions (except if you are Ubuntu users), there are Gnome, KDE and XFCE. Every users has their own preferences, I don’t know about Indonesia, but as long as I know that American users prefer more to Gnome and European users prefer more to KDE since Gnome is from US and KDE is from Germany.

I used to be preferred more to Gnome because of it’s more customizable, but since KDE 4 launched and released officially, it has attracted me with the widgets and it’s Vista-like layout. So I could show it to my friends and prove that Linux is cool!
View of My KDE 4 Desktop

I’m running Kubuntu 8.04 (not an official version but a community development version with KDE 4 inside) at my laptop and OpenSuse 11 at my desktop. Then I found several problems in using KDE 4 :
(more…)

Between OpenSuse, Fedora and Ubuntu

July 14, 2008

They are the big three distros in the Linux World

Open Suse LogoOpenSuse
OpenSuse is a powerful distro, originally it came from Germany, but later the company bought by Novell which is an US company. It’s a very stable but conservative distro, they would not include the program if that’s not stable yet, For Example they still put RealPlayertm 10 rather than RealPlayertm 11 (and it almost one year after the 11th released).

  • Strength
  • It’s very strong and stable distro, rarely crashed (unless you try to install something which not compatible). The YAST control panel is an easy and user friendly configuration tool
  • Weakness
  • Yet it’s stable but it’s out of date (or yet it’s out of date but it’s stable, i’m confused), you can’t enjoy the latest version of the program as soon as another distro, and it’s rather difficult to hack this distro, because the alternative package is difficult to find.

Fedora LogoFedora
A free operating system from the famous distro : RedHat. Fedora offers You an easy to customize system. A lot of RPM available everywhere, and it’s easy to install (like .exe programs).

(more…)

Compile Separated AVI Movie in Ubuntu

August 1, 2007

Ubuntu LogoRecently, I upload an AVI movie from RapidShare, I got confused because the filename extensions doesn’t end with .avi but .001 and .002, I renamed it into .avi but just the first file was able to be watched the second file wasn’t.

I realized that those files are DVDrip files and need to be compiled. But how?

I’ve tried to install all DVDrip programs in my Kubuntu 8.04, from dvd::rip until AcidRip, but the result was I’m getting more confused. Then I found this article, and got some clues. The article is in Bahasa Indonesia, I just rewrite it in English, here’s the instruction :

  1. Install the Mencoder packages using this command :
    $ sudo apt-get install mencoder mplayer
  2. If there are 3 files, compile the file using this command :
    $ cat A.001 B.002 C.003 > [your movie name].avi
  3. Repair the video and sound indexing using this command :
    $ mencoder -forceidx -oac copy -ovc copy [your movie name].avi -o [your final movie name].avi
  4. Enjoy your movie with your media player

I hope this post could help you


Anton Hermansyah

Logo of Anton Hermansyah